Garden figures with their own hands – ideas
Harmonious landscape design can be imagined without garden sculptures, experts say landscape design. Moreover, some garden styles simply do not suffer their presence. But, in the vast majority, a variety of garden figures emphasize the originality of landscape design, adding to it the perfection and taste. In this article we will discuss and show how to make interesting garden sculptures and other decorative elements of landscape design with their own hands.
Of course, today you can easily buy almost any garden sculpture. But, at a minimum, such products have two drawbacks:
- Financial expenses;
- Not originality.
Another thing is garden figures of handmade. This is an opportunity to save, and – a sculptor to stay alive. This case is not complicated and does not require serious expenses for materials. In some cases, it is quite possible to do this and improvised means.
Garden figures – how to do?
We propose to review interesting ideas of creating garden sculptures with their own hands. You can realize these ideas in your own way, creating, in fact, unique products that will become the original decoration of your garden, or you can go already protopovym way, having made interesting decorative elements for landscape design.
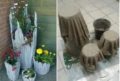
Concrete pots from the old towel
For the manufacture of these garden-shaped pots, which have not only aesthetic but also practical value, you will need powder-like cement and old cloth (preferably terry towel).
Cut the corners of the towel to make the top of the cushion more relief. We will put on a chosen vessel (from its size and shape the appearance of the future sculpture depends on) a garbage bag for its protection. It is desirable that the vessel for the creation of the garden figure was made of plastic, for example, a plastic bucket or basket for linen. Metal dishes after drying the pots will be harder to pull out of it.
We will distribute cement with water in a proportion of approximately 1: 4 (the consistency should be like sour cream). In it, we wet our towel, but so that each of his threads “smeared” in the cement. We extract the fabric from the cement mortar and cover it with the chosen vessel. Carefully fix the bottom so that there is no wrinkle. We give the desired shape to the lines of the casserole hands. From above we cover one more polyethylene package for protection against cracks. Leave in the sun to dry.
To save our pots can be several days, it all depends on the thickness of the fabric and the temperature of the air. After our new garden figure has dried up, remove it from the vessel.
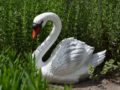
Garden figure is a swan-cushion
To do such a beauty, we need the following materials:
- A five-liter square plastic bottle;
- Iron wire with a diameter of about 0,5 mm;
- Medical Bandage;
- So-called starter putty;
- A small spatula;
- Convenient brush;
- A vessel where we will mix the solution;
- Sand.
The wire (pre-folded) inserts into the crust a bottle in which the hole was made. Fix inside with glue, small stones and so on. Pour the wet sand into a bottle to expand it from the sides.
On a polyethylene film we stir a solution of putty. We impose on the film a layer of solution – this is the future bottom of our garden figure-cushion. From above we “plant” a swan-bottle. The remnants of the putty are smeared to the top. Soak the spatula from time to time so that the solution is well laid.
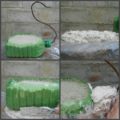
Now – the neck. This is the most difficult moment. With wet hands we form a roller of solution and smear it with a bottle bottle crust. You can fix the job with a wet brush. With it and a spatula we oversee the whole bottle with a solution in the thickness of 2 cm.
To make wings, use a metal rectangular grid with sides approximately 15 and 30 cm (2 pieces). To give a wing shape, bend it slightly. Then we press it into a swan blank and immediately fix it with a putty. Our half-finished product requires half an hour of rest. The back part of the wing is something to support, so as not to fall off.
Come back to the neck. Screw on it a wet bandage, slowly squeezing your hands. While “resting” the neck, we return to the wings – level all the flaws.
The tail of the swan will serve as a small piece of net or wire, bent at an angle of 40-45 degrees. We fix the solution and support something. While the bottom of the tail dries down, we fix the head. Then we return to the tail – we will lift its top.
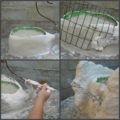
So, alternating tail-neck-head, apply a layer on a layer of putty on all parts of the future garden figure. We will need several approaches to each swan element.
Framing the edge of the workpiece with a roller of putty and smoothing. Actually, our swan is almost ready. It takes 3-4 hours to pick it up. It should dry in the sun for several days under cover of polyethylene, so as not to crack. Then we clean it with sandpaper for plaster (special such a mesh), then – a normal zeroing, ground for painting and paint with ordinary paint-enamel (two layers). At the end – draw your eyes and beak and cover all the beauty with varnish (preferably, also in two layers).
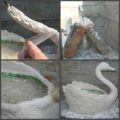
That’s all. I had to mourn a bit, but such a swan would become an ornament of any landscape design with his own hands. Do not forget to just plant flowers in it. Still, this is not just a garden figure, but a pillow.